
DSP-8C Owner's Manual
Applies to firmware 1.7 and later.
This manual provides details and usage instructions for the CoLinear Acoustics DSP-8C. It covers what is in the box, what the front and rear panels do, how to get the unit set up for the first time, and what to check if something is not behaving as you would expect.
Configuration of the DSP-8C (crossovers, filters, delays and so on) is done from a computer using DSPconfig, our free cross-platform control software. DSPconfig usage is covered separately via the Getting Started with DSPconfig guide and the DSPconfig Reference.
What is in the box
- The DSP-8C
- 1 x infrared remote control
- 1 x 22.5W universal AC adapter
- 1 x 2m braided USB-A to USB-B cable
The front panel
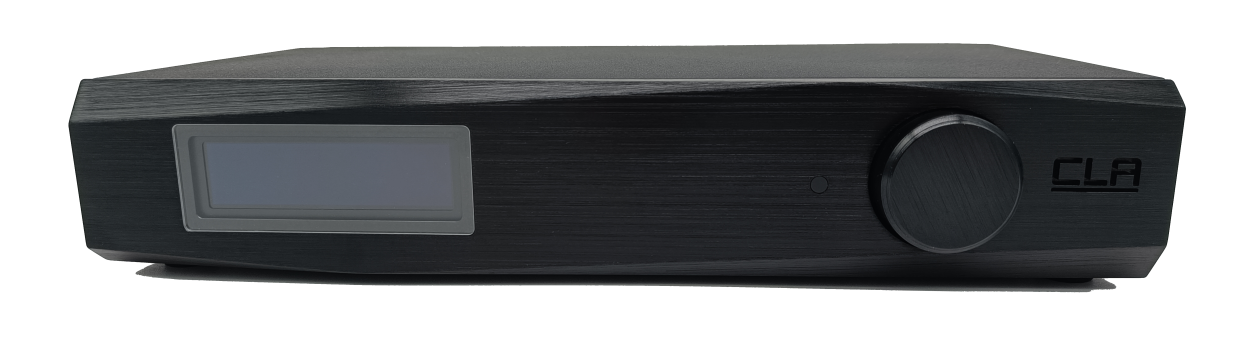
To the left is the monochrome OLED display and to the right is the rotary encoder. The small round window adjacent to the rotary encoder is the infrared receiver window for the remote control.
The rotary encoder has three functions:
| Action | On the home screen | On any other screen |
|---|---|---|
| Rotation | Changes the volume | Moves through the options |
| Short press | Opens the menu | Selects the highlighted option |
| Long press | Enters standby | Enters standby |
Note that if the display has timed out and switched itself off, the first press will only wake the display and not select anything.
The home screen
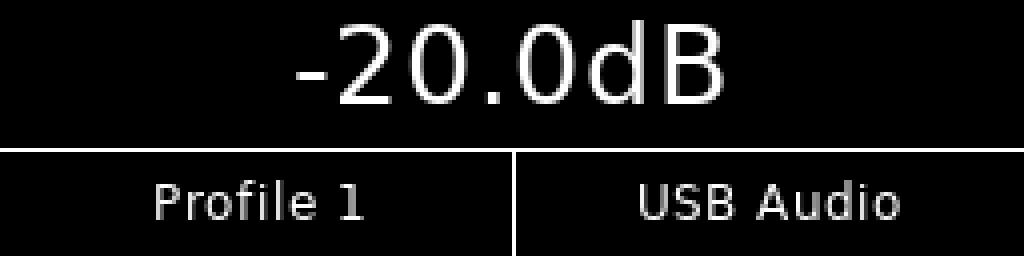
The home screen shows the active profile, the active audio input and the master volume. Profiles are shown by the name you give them in DSPconfig, or as Profile 1 to Profile 4 if they have not been renamed. Names that are too long for the display are shortened with an ellipsis.
Depending on how you have configured your unit, the volume section may display one of the following alternatives:
| Shown | Meaning |
|---|---|
| Mute | You have muted the unit |
| Digital Out | The active profile sends its audio to the S/PDIF output rather than to the analogue outputs |
| Fixed | The unit is in fixed volume mode |
Fixed volume mode holds the DAC at full scale and disables the volume controls, and is useful when something downstream is handling volume, such as an integrated amplifier. This option can be set using DSPconfig.
The home screen can optionally be configured to display just the volume, allowing it to use a much larger font. See the Overview setting below.

The menu

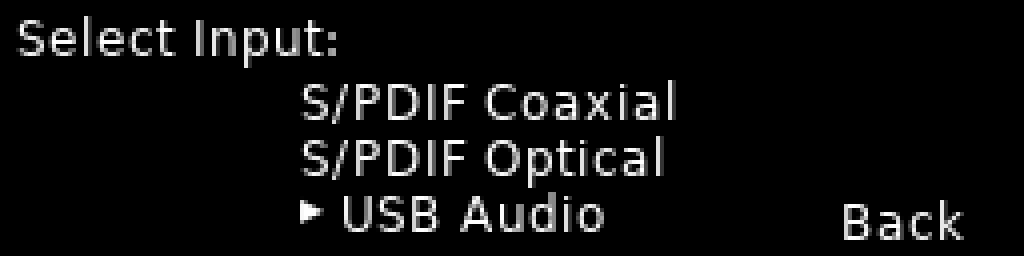
Press the rotary encoder on the home screen to open the menu, which lists the following items:
| Item | Function |
|---|---|
| Select Profile | Choose between the four profiles, listed by name |
| Select Input | Choose between S/PDIF Coaxial, S/PDIF Optical and USB Audio |
| Settings | See below |
| Back | Return to the home screen |

Settings
| Setting | Function |
|---|---|
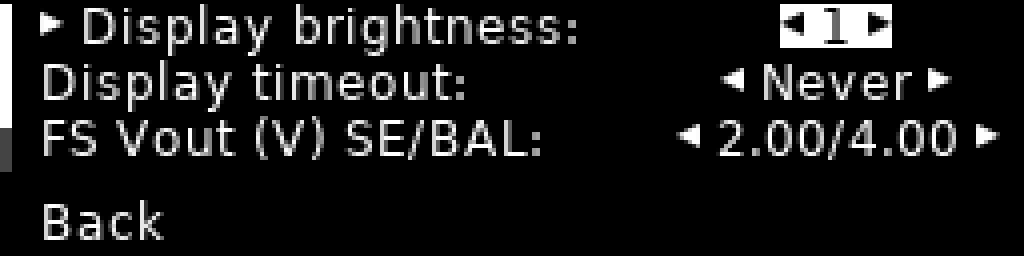
| Display brightness | Adjust the brightness of the display, in six steps |
| Display timeout | Set the automatic display timeout to one of: Never, 30 seconds, 60 seconds or 120 seconds |
| FS Vout (V) SE/BAL | The full-scale output voltage, in eleven steps from 2.00 V to 2.50 V single-ended, i.e. 4.0 V to 5.0 V balanced |
| Overview | Normal, the standard home screen, or Volume, which shows just the volume in a large font |
To change a setting, turn the rotary encoder to move the cursor to it, press to start editing, then turn to change the value. The full-scale output voltage is a setting of the unit rather than of a profile, so it applies whichever profile is loaded.
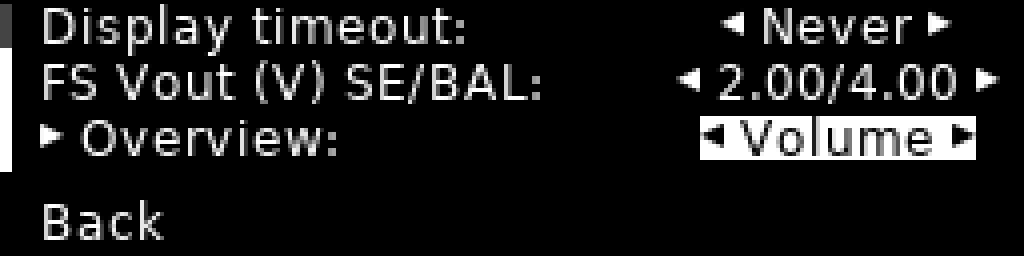
The display timeout does not apply whilst the logo is shown during start-up, or during a firmware update.
The rear panel
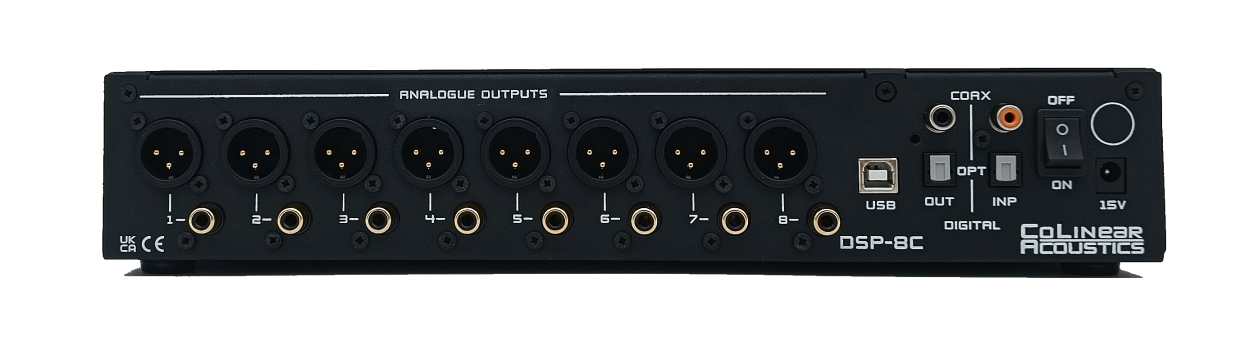
Working from left to right:
| Section | Description |
|---|---|
| Analogue outputs | Eight channels, numbered 1 to 8 from left to right, each with a balanced XLR on the upper row and a single-ended RCA below it. Each channel can be individually configured to output over either XLR or RCA |
| USB | A USB-B socket, which carries both the USB audio input and the connection that DSPconfig uses |
| Digital | Input and output coaxial and optical S/PDIF connectors |
| Power | A physical on/off switch and the DC input, which takes the supplied 15V adapter |
| Serial number | The round sticker located above the DC input is a QR-encoded serial number |
All audio inputs support up to 192kHz / 24-bit PCM audio.
First setup
- Connect the outputs you intend to use, and the input you intend to play from.
- If you are going to use USB audio, or to configure the unit with DSPconfig, connect the supplied USB cable between the unit and your computer.
- Connect the supplied adapter to the DC input and set the rear panel switch to ON.
You will hear a click from the unit when it starts up. This is normal and represents the relays being tested.
The logo appears immediately, and the home screen replaces it once the DSP has started and the active profile has loaded. Choose your input from the menu or with the remote.
A new unit has none of the output channels mapped to the input channels, so no audio will play until you have created your first profile configuration using DSPconfig.
Profiles and the remote
The unit holds four profiles. Each profile represents a complete configuration for your system, including filters and crossovers, delays and gains, whether each output uses its RCA or XLR socket, and whether the profile's audio goes to the analogue outputs or to S/PDIF.
You can switch between saved profiles freely, which can be useful for A/B testing different configurations.
The remote
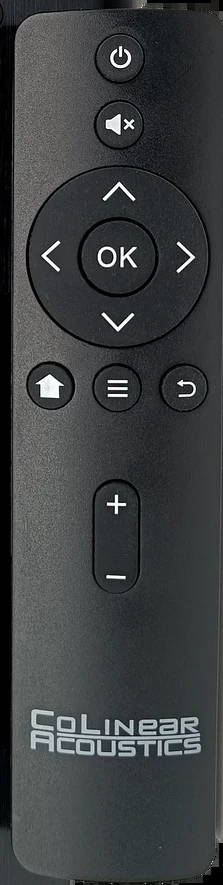
The supplied remote control uses the infrared Philips RC-5 protocol. Point it directly at the unit's front panel for maximum range.
The keys are marked with symbols rather than words. Working down the handset from the top:
| Key | Function |
|---|---|
| Power symbol | Standby and wake |
| Bell with a cross through it | Mute and unmute |
| Five-way pad, with OK in the middle | Move through the current screen and select the highlighted option |
| Home | Return to the home screen |
| Menu | Open the menu |
| Back | Go back one screen |
| + and - | Volume up and down |
There are two built-in short cuts when the unit is displaying the home screen:
| Keys | Short cut |
|---|---|
| Left and Right | Quick profile selection: opens the profile chooser at the previous or next profile |
| Up and Down | Quick input selection: opens the input chooser at the previous or next input |
Universal remotes and control systems
If you want to drive the unit from a universal remote or an installed control system, it responds to Philips RC-5 on device address 0x1A. The commands sent by the keys on the supplied handset are:
| Command | Key |
|---|---|
| 0x01 | Standby |
| 0x02 | Mute |
| 0x03 | Up |
| 0x04 | Left |
| 0x05 | OK |
| 0x06 | Right |
| 0x07 | Down |
| 0x08 | Home |
| 0x09 | Menu |
| 0x0A | Back |
| 0x0B | Volume up |
| 0x0C | Volume down |
The firmware also implements a set of extended commands that are not on the supplied handset. These let a control system go straight to a profile, an input or a screen rather than walking through the menu:
| Command | Function |
|---|---|
| 0x0D to 0x10 | Select Profile 1 to 4 directly |
| 0x11 | Open the Select Profile screen |
| 0x12 | Open the Select Input screen |
| 0x13 | Open the Settings screen |
| 0x14 | Select the S/PDIF coaxial input directly |
| 0x15 | Select the S/PDIF optical input directly |
| 0x16 | Select the USB input directly |
| 0x17 | Display brightness up one step |
| 0x18 | Display brightness down one step |
Note that in standby the unit only responds to the Standby command; every other command is ignored until the unit is awake.
Standby
Press and hold the rotary encoder, or press the power button on the remote, to enter the low-power standby mode. The display is turned off and audio output is stopped.
To wake the unit from standby, press the rotary encoder button or the power button on the remote control.
Connecting to DSPconfig
DSPconfig runs on Windows, macOS and Linux, and is a free download from the Downloads page. Once installed, it will automatically detect any DSPs connected via the supplied USB cable.
Getting Started with DSPconfig walks through designing a profile and sending it to the unit, and there is also the DSPconfig Reference.
Updating firmware
Firmware updates are delivered through DSPconfig, from the Device > Firmware menu. DSPconfig will tell you when the connected unit has an update available.
Whilst the update runs the unit shows:
Upgrading firmware...
Do not power off your device
The unit will restart itself as soon as the update has been completed.
Specifications
| Digital inputs | 1 x USB audio (UAC2), 1 x S/PDIF coaxial, 1 x S/PDIF optical (all up to 192kHz / 24-bit) |
| Analogue outputs | 8 x RCA single-ended, 8 x XLR balanced |
| Digital outputs | 1 x S/PDIF coaxial, 1 x S/PDIF optical (both up to 192kHz / 24-bit) |
| Full-scale output | 2.00 V to 2.50 V single-ended, 4.0 V to 5.0 V balanced, in eleven increments |
| Processing rate | 96kHz or 192kHz (configurable per profile) |
| Profiles | 4 |
| Dimensions | 330 x 180 x 70 mm (W x D x H) |
| Weight | 1.55 kg net, 2.2 kg gross |
| Power | 15 V DC, from the supplied external 22.5 W universal AC adapter |
| Control | DSPconfig for Windows, macOS and Linux; infrared remote |
| Compliance | CE, UKCA, FCC Part 15 Class B |
The number of filters and the amount of delay a profile can hold depend on the sampling rate and can be found in the Capacities section of the DSPconfig Reference.
Troubleshooting
The unit clicks when I switch it on
Normal behaviour - every output relay is pulsed and settled at each start-up.
No sound at all, and the Mute key does nothing
The unit holds itself muted, and ignores the Mute key, if the loaded profile could not be read.
This may happen if the USB cable is removed whilst a profile was being uploaded. Re-saving the profile from DSPconfig recovers it.
No sound from one channel, or from the RCA sockets but not the XLRs
Each analogue output channel is individually configurable to output over either RCA or XLR; not both. Check that channel's output setting in DSPconfig is configured correctly for your system, and that the correct profile is selected on the unit once it has been saved.
No sound from the analogue outputs, and the display shows Digital Out
The loaded profile sends its audio to the S/PDIF output. Change profile, or change that profile's output in DSPconfig.
The volume control does nothing, and the display shows Fixed
The unit is in fixed volume mode, which holds the DAC at full scale and disables the volume controls. This setting can be changed in DSPconfig.
The rotary encoder only seems to work every other press
When the display has timed out, the first press wakes it and does nothing else.
The display goes dark on its own
That is the display timeout, in Settings. Set it to Never if you would rather it stayed on.
The remote does nothing whilst the unit is in standby
In standby, the unit only responds to the power key on the remote or a press of the rotary encoder.
The display shows DSP Boot Failed
The DSP did not start for some reason - connect the unit to DSPconfig for more information and contact us.
The display shows Recovery Mode
The unit was switched on with the rotary encoder held down, which puts it into a mode for recovering from a failed update. No profile is loaded and no audio is processed, but DSPconfig can reach the unit and write firmware to it.
Still not right
If none of the above matches what you are seeing, get in touch and tell us the model, the firmware version (shown in DSPconfig's Device menu), what you did and what happened.
Warranty and support
Every unit is guaranteed for 24 months from the date of delivery. If it fails in that time through a defect in materials or workmanship, we will repair or replace it and pay the carriage both ways. If repair or replacement is not possible, we will refund your order.
The guarantee stays with the unit rather than the original buyer. If you bought your DSP-8C second-hand, you have whatever is left of its 24 months, and you do not need the original receipt to claim.
The guarantee is in addition to your legal rights.
The full terms, including what the guarantee does not cover and how cancellations and refunds work, are published at colinear-acoustics.co.uk/terms-of-use.
If something is wrong
Please read Troubleshooting first.
If you are still stuck or require further assistance, please email [email protected] with:
- The model (DSP-8C) and the serial number, which can be found on the round QR sticker on the rear panel beside the power switch
- The firmware version, from DSPconfig's Device menu
- What the unit is doing, and what you were doing when it started
Most issues can be answered remotely via email, but, in the rare case that you need to return the unit to us, we will provide you full instructions for how to carry out the RMA process.
Safety and compliance
The DSP-8C runs off extra-low voltage (15V), with the mains supply handled by the included external AC adapter. The AC adapter carries its own approvals for the region it is shipped to.
Please use the adapter supplied with the unit. If you ever need a replacement, contact us rather than substituting one, so that the unit stays within the conditions it was tested under.
Our hardware carries the CE mark for the European Economic Area and the UKCA mark for Great Britain. Either mark is now accepted in the UK, as recognition of CE marking for the EMC and low voltage regimes was extended indefinitely in October 2024.
For the United States, the product is declared under FCC Part 15, Subpart B, as a Class B digital device. It contains no radio transmitter. The supplied remote control is infrared, which is outside the scope of radio equipment regulation everywhere we ship.
A Declaration of Conformity listing the directives and standards applied is available on request.
Disposal
Electrical and electronic equipment should not be put in with general household waste at the end of its life. Please take it to a local collection point for waste electrical and electronic equipment, or contact us and we will arrange to take it back and dispose of it properly.
The remote control contains a battery. Remove it before disposing of the remote and take it to a battery collection point; most supermarkets and hardware shops have one.